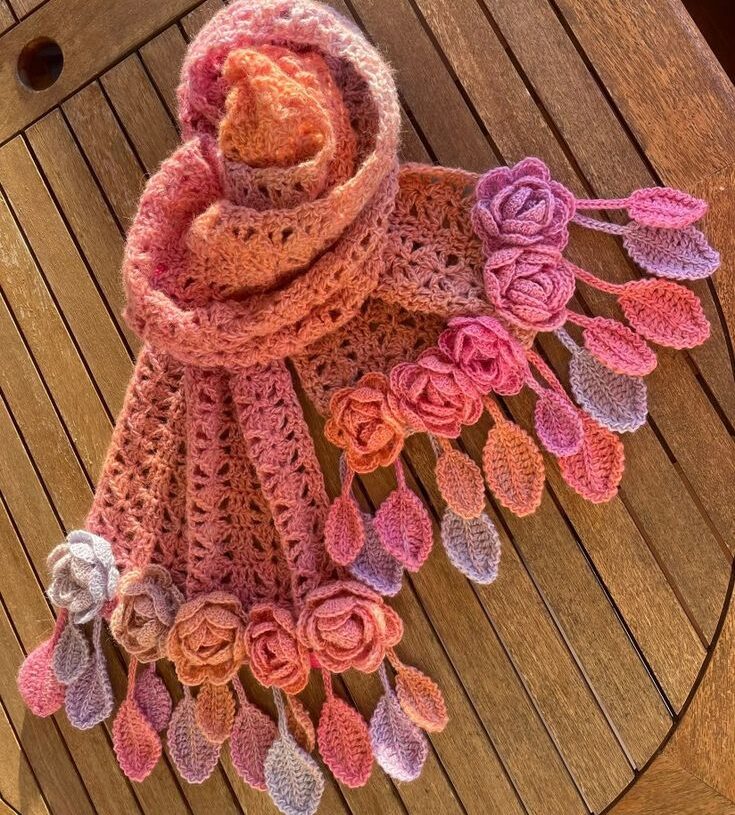
This statement scarf blends a lightweight openwork texture with romantic, dimensional embellishments. Using a gradient yarn cake creates a seamless color shift from peach-orange to dusty rose and lavender, accented by matching sculpted roses and dangling leaf tassels.
Materials Needed
- Yarn: 200–300 g of DK or light worsted weight gradient/ombré yarn (wool blend or soft acrylic in orange, rose pink, and lavender hues)
- Crochet Hook: US size G/6 or 7 (4.0 mm – 4.5 mm), matched to yarn weight
- Tapestry Needle: For assembling components and weaving in loose ends
- Scissors
- Stitch Markers / Blocking Pins (optional)
Step 1: Crocheting the Scarf Body
The base uses a lightweight, airy lace stitch (such as an open V-stitch) that drapes naturally without feeling bulky.
- Foundation: Chain to a width of roughly 20–25 cm (approximately 8–10 inches), making sure your stitch count aligns with your chosen openwork pattern repeat.
- Openwork Pattern: Work alternating rows of V-stitches (e.g.,
(1 dc, ch 1, 1 dc)in the designated stitch, skip 2 chains). - Continue Lengthwise: Crochet until the scarf measures approximately 160–180 cm (63–71 inches) from end to end, letting the self-striping ombré yarn naturally transition from shade to shade.
- Fasten Off: Cut the yarn, secure the final loop, and block the rectangle lightly if needed to even out the lace edges.
Step 2: Crocheting the 3D Roses
Each rose begins as a flat, ruffled strip that rolls into a layered blossom.
- Base Strip: Using various color sections of your yarn (orange, pink, lavender), chain 30–40 stitches for medium roses, or 45–50 stitches for larger blossoms.
- Ruffle Row: Work a row of single crochets. In the next row, form petals by working
(1 sc, skip 1 st, 5 dc into the next st, skip 1 st)across the length to create a wavy ribbon. - Forming the Rose: Roll the strip inward into a spiral, keeping the flat foundation chain aligned along the base.
- Securing: Using a tapestry needle and a yarn tail, stitch firmly through the bottom layers to lock the spiral into a 3D rose. Make approximately 12–16 roses in varying sizes and matching color tones.
Step 3: Crocheting the Hanging Leaf Tassels
Leaves are worked in quick rounds around a center chain, suspended by a long chain tail to create a cascading effect.
- Leaf Body: Chain 9.
- Shaping: Working along one side of the chain: 1 sc in 2nd ch from hook, 1 hdc in next ch, 1 dc in next 3 chs, 1 hdc in next ch, 3 sc in the last ch (rounding the tip). Rotate to work across the opposite edge: 1 hdc, 3 dc, 1 hdc, 1 sc. Slip stitch to the starting sc.
- Hanging Stem: Chain 8–15 stitches directly from the base of the leaf to create stems of varying lengths. Leave a 10 cm (4-inch) tail for sewing.
- Quantity: Crochet approximately 24–32 leaves in coordinating peach, pink, and lilac tones.
Step 4: Assembly and Finishing Touches
- Attach Leaves to Roses: Secure 2 to 3 leaf stems to the underside of each rose using a tapestry needle, staggering the lengths so the leaves dangle at natural intervals.
- Position the Roses: Arrange the rose clusters along both ends of the scarf. Match the flower colors to the background section of the scarf (e.g., peach roses on peach edges, lavender roses on lavender edges) for a cohesive gradient effect.
- Secure Placement: Sew each rose cluster securely along the scalloped edges of the scarf ends, ensuring the leaf fringe hangs freely downward.
- Weave Ends: Thread all remaining yarn tails into the tapestry needle and weave them cleanly into the back of the dense flower bases.